How to Use Your AI Agent to Create Faceless Videos Automatically
If you want to create faceless videos at scale, the worst thing you can do is depend on a manual editing workflow for every single one.
That works for one video. It falls apart the moment you want to make ten. Or fifty. Or a repeatable content system that turns articles, scripts, updates, or prompts into finished videos on demand.
A better approach is to let your AI agent coordinate the workflow for you.
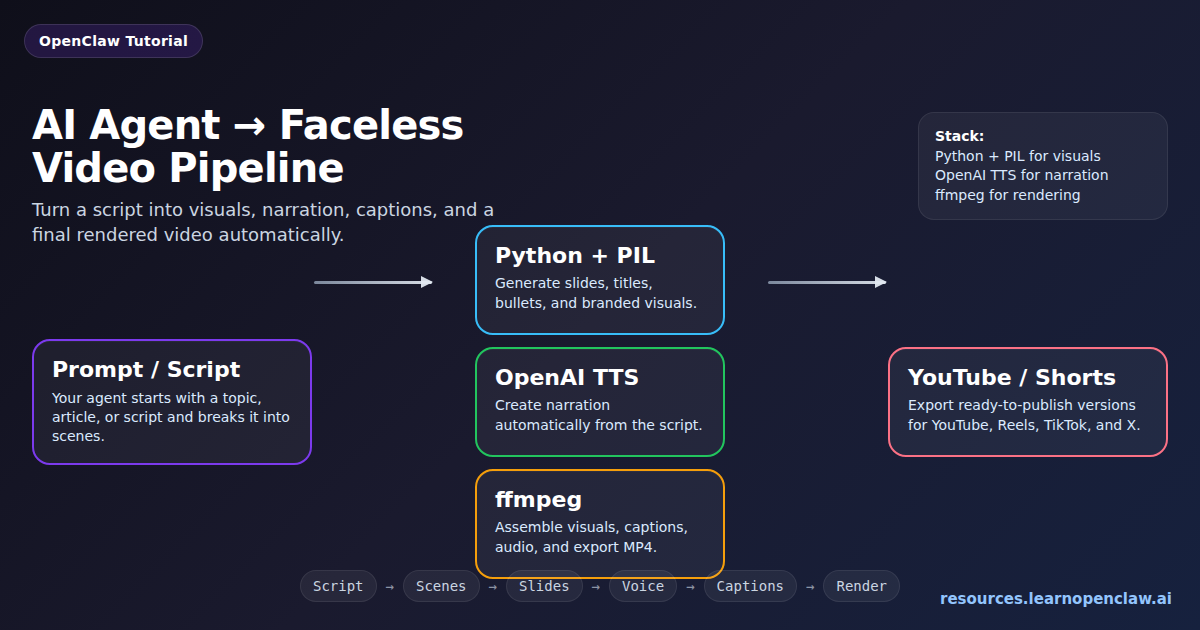
This is the stack we’ve been using:
- Slides and visuals: Python + PIL
- Voice narration: OpenAI TTS
- Video assembly and rendering: ffmpeg
That combination is simple, practical, and far more powerful than it sounds.
Your AI agent can take a topic or script, split it into scenes, generate slides, create narration, add captions, render the final file, and export platform-ready faceless videos automatically.
This is not “click one button and get Hollywood.” It is better than that. It is a reliable system.
And reliable systems beat flashy demos every time.
What is a faceless video workflow?
A faceless video is any video that does not depend on a person appearing on camera.
Instead, the content is built from assets like:
- slides
- text overlays
- simple graphics
- screen captures
- stock footage
- AI narration
- subtitles and captions
This makes faceless videos much easier to automate than camera-led content.
You do not need filming days. You do not need retakes. You do not need to re-record voiceover every time you change two lines in a script.
That is exactly why this is such a strong use case for AI agents.
Why an AI agent is the right tool for this job
The real value of an AI agent here is not that it “creates videos magically.” The value is that it coordinates a structured pipeline.
That distinction matters.
A manual video workflow usually looks like this:
- Write the script
- Design the slides manually
- Record narration
- Edit mistakes
- Import everything into a video editor
- Adjust timing
- Export
- Repeat when the script changes
An agent-based workflow changes the job completely.
Instead of building every asset by hand, your AI agent can:
- write or refine the script
- split the script into scenes
- generate slides from templates
- create narration with TTS
- generate subtitles from the script or timestamps
- assemble the final video with ffmpeg
- export different aspect ratios for different platforms
That means you stop behaving like a human render farm and start acting like a system designer.
That is a much smarter way to produce content.
The exact stack: Python + PIL, OpenAI TTS, and ffmpeg
This workflow works because each tool has one clean responsibility.
1. Python + PIL for slides and visuals
Python handles the logic. Pillow handles the image generation.
This layer creates the visuals that carry the video: title slides, bullets, quotes, section dividers, CTA screens, branded layouts, and other simple but effective scenes.
Instead of dragging text boxes around in a design tool, you define templates in code.
That gives you control over:
- canvas size
- fonts
- colors
- padding and spacing
- text wrapping
- export order
- reusable layouts
Once you have those templates, generating the next video becomes much faster. You are no longer designing from scratch. You are filling a system.
2. OpenAI TTS for narration
Once the script is ready, OpenAI TTS turns the text into a clean voiceover file.
This removes one of the most annoying parts of faceless video production: manual recording.
Without TTS, every revision becomes a mess. You re-record lines, cut mistakes, replace takes, then fix the timing again.
With TTS, your agent just regenerates the narration.
That gives you:
- fast iteration
- consistent voice quality
- no recording setup
- easy revisions
- much stronger automation potential
If your goal is educational, explanatory, or content-at-scale video production, this tradeoff is usually worth it.
3. ffmpeg for assembly and rendering
ffmpeg is the engine that turns all the generated assets into an actual video.
It handles:
- image sequence to video conversion
- audio + video assembly
- captions and subtitle burn-in
- music mixing
- resizing and cropping
- final MP4 encoding
Yes, ffmpeg looks intimidating the first time you see it.
No, you do not need to master the whole thing.
For this workflow, you only need a handful of dependable commands. Once those are working, you can reuse them forever.
What the full pipeline looks like
A practical faceless video pipeline looks like this:
- Input: prompt, blog post, notes, script, or product update
- Script generation/refinement: your AI agent writes or cleans the narration
- Scene breakdown: split the script into visual chunks
- Slide generation: Python + PIL creates slide images
- Voice generation: OpenAI TTS produces narration audio
- Captions: generate subtitle timing or use scene text directly
- Render: ffmpeg assembles everything
- Export: generate final assets for YouTube, Shorts, Reels, X, or your site
The important thing is that each step is structured. Your agent is not improvising the whole production from scratch every time. It is moving content through a repeatable pipeline.
A better way to think about scene generation
Most people explain video automation too vaguely. They say things like “generate scenes” and move on.
That skips the part that actually matters.
A much better model is to give the agent a structured scene format.
For example, each scene could contain:
- scene title
- voiceover text
- slide headline
- supporting bullets
- visual type (title, bullets, quote, CTA, etc.)
- estimated duration
- aspect ratio target
Once your agent outputs scene data in a consistent structure, the rest becomes dramatically easier.
Example scene data structure
[
  {
    "scene": 1,
    "type": "title",
    "headline": "How to Use Your AI Agent to Create Faceless Videos Automatically",
    "bullets": [
      "Python + PIL for visuals",
      "OpenAI TTS for narration",
      "ffmpeg for rendering"
    ],
    "voiceover": "In this tutorial, I’ll show you how to use your AI agent to create faceless videos automatically.",
    "duration": 6
  },
  {
    "scene": 2,
    "type": "bullets",
    "headline": "Why This Workflow Works",
    "bullets": [
      "Fast to iterate",
      "Easy to scale",
      "No manual editing bottleneck"
    ],
    "voiceover": "This workflow works because each tool does one job well, and your agent coordinates the whole process.",
    "duration": 7
  }
]
This kind of structure is gold. It gives your agent something concrete to produce and gives your rendering pipeline something reliable to consume.
Generating slides with Python + PIL
Python + PIL is ideal for this kind of content because faceless videos usually benefit more from clarity than from complexity.
You do not need fancy animation to make useful content. You need:
- strong visual hierarchy
- high contrast
- clean spacing
- consistent branding
- readable text
A basic slide renderer might:
- create a 1920×1080 or 1080×1920 canvas
- apply a background color or gradient
- draw a title and supporting bullet points
- place simple accent shapes or icons
- export files like
scene-001.png,scene-002.png, and so on
Here is a minimal example of how that might look:
from PIL import Image, ImageDraw, ImageFont

WIDTH, HEIGHT = 1920, 1080
BG = "#0f172a"
TEXT = "#ffffff"
ACCENT = "#7c3aed"

img = Image.new("RGB", (WIDTH, HEIGHT), BG)
draw = ImageDraw.Draw(img)

title_font = ImageFont.truetype("/usr/share/fonts/truetype/dejavu/DejaVuSans-Bold.ttf", 72)
body_font = ImageFont.truetype("/usr/share/fonts/truetype/dejavu/DejaVuSans.ttf", 42)

draw.rounded_rectangle((100, 100, 1820, 980), radius=30, outline=ACCENT, width=6)
draw.text((160, 170), "How to Use Your AI Agent to Create Faceless Videos", fill=TEXT, font=title_font)
draw.text((160, 340), "• Python + PIL for slides", fill=TEXT, font=body_font)
draw.text((160, 420), "• OpenAI TTS for narration", fill=TEXT, font=body_font)
draw.text((160, 500), "• ffmpeg for final rendering", fill=TEXT, font=body_font)

img.save("scene-001.png")
This is simple on purpose. Simplicity is a feature here, not a weakness.
Generating narration with OpenAI TTS
The next step is turning your script into voice.
Once you have structured scene text, your agent can either:
- generate one narration file for the full script, or
- generate one audio file per scene for tighter timing control
Scene-level narration is often easier to manage because it gives you more flexibility during assembly.
At a conceptual level, the flow looks like this:
from openai import OpenAI

client = OpenAI()

voiceover_text = """
In this tutorial, I’ll show you how to use your AI agent
to create faceless videos automatically using Python,
OpenAI text-to-speech, and ffmpeg.
"""

with client.audio.speech.with_streaming_response.create(
    model="gpt-4o-mini-tts",
    voice="alloy",
    input=voiceover_text
) as response:
    response.stream_to_file("voiceover.mp3")
The exact model name or voice choice may change over time, but the pattern stays the same: text in, narration file out.
Why subtitles matter more than people think
A lot of faceless video tutorials skip captions or treat them like an optional extra.
That is a mistake.
Captions matter because:
- many viewers watch muted first
- short-form platforms reward highly legible content
- captions improve retention and comprehension
- they make AI narration feel more intentional
Your first version does not need advanced karaoke-style animation. Even clean burned-in subtitles are a major upgrade.
You can generate captions from:
- the original script
- scene-level narration timing
- a transcript pass after narration is generated
If you want your output to look more polished, this is one of the highest-leverage improvements you can make.
Assembling the final video with ffmpeg
Once you have slides and narration, ffmpeg takes over.
A basic image + audio render might look like this:
$ ffmpeg -loop 1 -i scene-001.png -i voiceover.mp3 \
  -c:v libx264 -tune stillimage -c:a aac -b:a 192k \
  -pix_fmt yuv420p -shortest scene-001.mp4
If you want to stitch multiple scene videos together, you can use a concat workflow:
$ cat > inputs.txt << EOF
file 'scene-001.mp4'
file 'scene-002.mp4'
file 'scene-003.mp4'
EOF

$ ffmpeg -f concat -safe 0 -i inputs.txt -c copy final-video.mp4
And if you already have an SRT subtitle file, you can burn captions directly into the output:
$ ffmpeg -i final-video.mp4 -vf "subtitles=captions.srt" \
  -c:a copy final-with-captions.mp4
This is where the system becomes real. You are no longer talking about hypothetical automation. You are producing deliverables.
Landscape, vertical, and platform-specific exports
One of the biggest advantages of a code-first pipeline is that you can export multiple versions from the same source.
That means one script can become:
- a 16:9 YouTube video
- a 9:16 Short or Reel
- a square version for social
Instead of redesigning everything manually, you create alternate layout templates and render variants automatically.
That is where this starts behaving like a real content engine.
For example:
- 1920×1080 for YouTube
- 1080×1920 for Shorts/Reels/TikTok
- 1080×1080 for square social clips
Once your templates support those sizes, your agent can choose the right output based on destination platform.
What kinds of videos this workflow is best for
This approach is especially strong for:
- Educational videos — tutorials, how-tos, explainers
- YouTube automation — repeatable faceless content pipelines
- Product education — release summaries, onboarding, feature walkthroughs
- Blog-to-video — convert written content into narrated summaries
- Social clips — fast tip videos and visual summaries
- Documentation-driven content — tutorials generated from structured knowledge
It is less ideal for cinematic storytelling, acting-heavy content, or anything that depends on a visible human presence.
That is fine. The goal here is not to replace filmmaking. The goal is to make useful video production repeatable.
Why this scales so well
This workflow scales because everything becomes structured input and reusable output.
A blog post can become:
- a narrated explainer video
- a vertical short
- a slide carousel
- a text-and-audio summary clip
A product update can become:
- a feature announcement video
- a customer education clip
- a social teaser
A documentation page can become:
- a tutorial walkthrough
- a support video
- a training asset
This is the real opportunity. Your AI agent does not just help make one video faster. It gives you a system that can keep turning content into media over and over again.
Common mistakes to avoid
1. Overcomplicating the visuals
Simple wins.
Readable text, strong contrast, clean composition, consistent branding. Most faceless videos do not fail because the visuals are too basic. They fail because the visuals are cluttered.
2. Writing for reading instead of listening
A blog sentence and a voiceover sentence are not the same thing.
Video scripts need shorter lines, cleaner rhythm, and more natural phrasing. If a sentence feels awkward to say out loud, it will usually sound awkward in TTS too.
3. Building a giant fragile system too early
Do not start with subtitles, music ducking, five aspect ratios, stock footage search, auto-posting, and analytics feedback loops all at once.
That is how people create a maintenance nightmare.
Start with this:
- generate slides
- generate narration
- render one clean final video
Then improve the pipeline one layer at a time.
4. Treating the agent like magic
The AI agent is not the product. The workflow is the product.
If your process is vague, the output will be vague. If your inputs are structured and your pipeline is deterministic, the results get much better.
Agents shine when they orchestrate reliable systems. This is exactly that kind of job.
What a more advanced version could include
Once the core pipeline works, you can add:
- automatic subtitle generation
- scene-based timing from real audio durations
- multiple voice options
- automatic vertical and horizontal layout variants
- intro and outro templates
- background music and ducking
- stock footage insertion for certain scene types
- JSON- or CSV-based batch rendering
- blog-to-video automation
- doc-to-video automation
- agent-triggered publishing workflows
This is where the system shifts from “helpful automation” to “real content production infrastructure.”
Why this is one of the best AI agent use cases
A lot of AI agent demos are flashy but useless.
This one is the opposite.
It has a clear input. It has a clear output. It combines creative generation with deterministic rendering. And it solves a real production bottleneck.
Your AI agent is not replacing judgment, taste, or strategy.
It is replacing repetitive production work.
That is the sweet spot.
Final takeaway
If you want to create faceless videos automatically, this is one of the cleanest stacks to start with:
- Python + PIL for visuals
- OpenAI TTS for narration
- ffmpeg for rendering and assembly
Then let your AI agent coordinate the pipeline.
That gives you a system that is:
- faster than manual editing
- easier to revise
- consistent across videos
- scalable for real content production
Once you build it once, you stop making videos one at a time.
You start building a machine that can keep making them for you.
FAQ
Do I need a full video editor for this workflow?
No. For structured faceless videos, Python + PIL, TTS, and ffmpeg are often enough. A traditional editor only becomes necessary if you need heavy manual polish or cinematic editing.
Can an AI agent really create the full video automatically?
Yes, if the workflow is structured. The agent can coordinate scripting, scene breakdown, asset generation, narration, captions, and rendering. The key is giving it a deterministic pipeline instead of vague instructions.
What types of faceless videos work best with this approach?
Tutorials, explainers, social clips, product education, and blog-to-video content are the best fits. Anything based on structured information tends to work well.
Should I generate one narration file or one file per scene?
Usually one file per scene is easier to manage. It gives you better timing control and makes it easier to revise individual scenes without re-rendering everything.
Do subtitles really matter?
Yes. They improve retention, help on muted autoplay platforms, and make the content easier to follow. Even simple captions are a major quality upgrade.
Can this workflow produce vertical videos too?
Absolutely. The easiest approach is to create alternate layout templates for 9:16 output and let the same agent pipeline render both landscape and vertical versions.
What is the biggest mistake people make?
Overengineering the first version. Start with slides, narration, and a clean render. Then add captions, music, transitions, and platform variants once the basic pipeline is stable.