What if your AI agent could pick up the phone and actually call people? Not send a text. Not fire off an email. Actually dial a number, have a real conversation, qualify leads, and book meetings — all without a human touching anything.
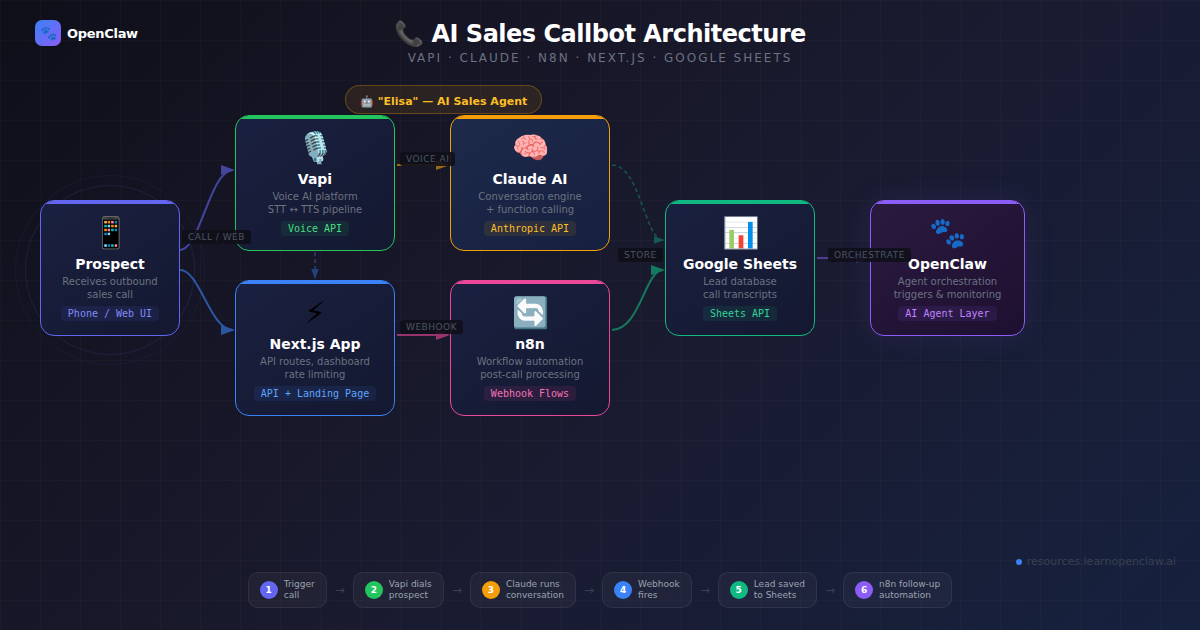
That’s exactly what we built. In this tutorial, we’ll walk through the complete process of building an AI-powered outbound sales callbot using Vapi (voice AI platform), Claude (LLM), n8n (automation), and Next.js (landing page + API). The AI agent — named Elisa — calls real phone numbers, runs a natural sales conversation, collects lead data via function calling, and pipes everything into Google Sheets through an n8n automation workflow.
By the end, you’ll have a fully functional AI sales system: a landing page where visitors enter their phone number, get called by an AI agent within seconds, and see their lead data appear in a live dashboard. The entire project is open source and deployable to Vercel.
What We’re Building
Here’s the full architecture at a glance:
- Landing Page (Next.js on Vercel) — visitor enters their phone number or talks directly in-browser
- Vapi API — triggers an outbound call with our AI agent (Elisa)
- Claude LLM — powers Elisa’s conversational intelligence through Vapi’s provider config
- Function Calling — Elisa calls tools mid-conversation to capture lead info, schedule meetings, and record outcomes
- Webhook — Vapi fires an end-of-call report to our Next.js API route
- n8n Workflow — receives the webhook, branches on qualification status, appends to Google Sheets, sends email confirmations, and alerts the sales team
- Live Dashboard — the landing page shows lead data from Google Sheets in real time
The tech stack: Next.js 16, TypeScript, Tailwind CSS v4, Vapi.ai, Claude 3.5 Sonnet, ElevenLabs (voice), Deepgram (transcription), n8n, and Google Sheets.
Prerequisites
Before you start, you’ll need:
- A Vapi.ai account — sign up at vapi.ai (they have a free tier with credits to start)
- A Vapi phone number — you’ll purchase one inside the Vapi dashboard (or use the web-call feature for free testing)
- Node.js 18+ installed
- An n8n instance — self-hosted or n8n Cloud
- A Google Sheet for lead storage
- A Vercel account for deployment (optional — works locally too)
Step 1: Project Setup
Start by scaffolding a new Next.js project with TypeScript and Tailwind CSS:
$ npx create-next-app@latest act-local-callbot --typescript --tailwind --app --src-dir=false
$ cd act-local-callbot
Install the Vapi web SDK for in-browser calling:
$ npm install @vapi-ai/webCreate the folder structure:
$ mkdir -p lib config components docs public
$ mkdir -p app/api/call/\[callId\] app/api/leads app/api/webhook
Set up your environment variables. Create a .env.local file:
# Vapi (server-side)
VAPI_API_KEY=your_vapi_api_key
VAPI_ASSISTANT_ID=your_vapi_assistant_id
VAPI_PHONE_NUMBER_ID=your_vapi_phone_number_id

# Vapi (client-side, for web calls)
NEXT_PUBLIC_VAPI_PUBLIC_KEY=your_vapi_public_key
NEXT_PUBLIC_VAPI_ASSISTANT_ID=your_vapi_assistant_id

# Google Sheets
GOOGLE_SHEETS_ID=your_google_sheet_id
GOOGLE_SHEET_NAME=Leads

# n8n automation
N8N_WEBHOOK_URL=https://your-n8n-domain/webhook/act-local-callbot

# App
NEXT_PUBLIC_APP_URL=http://localhost:3000
You’ll get the Vapi keys from your Vapi dashboard after creating an assistant (we’ll do that next).
Step 2: Design the AI Agent (Elisa)
The heart of this project is the AI agent configuration. Vapi needs three things to run your agent: a system prompt, a model/voice/transcriber config, and tool definitions for function calling.
The System Prompt
Create config/system-prompt.md. This is where you define Elisa’s personality, conversation flow, and rules. Here’s the core structure:
# Elisa System Prompt

You are **Elisa**, an AI Sales Development Representative for **Act Local**,
a digital marketing agency.

## Mission
Run friendly, professional outbound qualification calls. Identify whether the
lead is a fit, collect key contact details, and move qualified prospects toward
a scheduled strategy meeting.

## Company Context
Act Local helps businesses grow with:
- SEO (local + organic growth)
- PPC / Paid Ads (Google/Meta)
- Social Media Management
- Full-Service Digital Marketing Strategy

## Call Flow
1. Open confidently and introduce yourself as Elisa from Act Local.
2. Confirm this is a good time to speak.
3. Ask discovery questions about:
   - Business type
   - Current marketing efforts
   - Primary growth goals
   - Biggest bottleneck
4. Determine service interest (SEO, PPC, Social Media, or combo).
5. Collect lead details via tools (name, email, business name).
6. If qualified, offer to schedule a short strategy call.
7. Confirm next step and close warmly.

## Tone Guidelines
- Warm, concise, confident, and respectful.
- Speak naturally; avoid robotic or overly formal language.
- Keep answers short in voice format.
- Never pressure the lead.

## Tool Usage (MANDATORY)
You MUST call these tools — the data is only saved if you call them:
- **ALWAYS call `collectLeadInfo`** before ending ANY call where you spoke
  to a person. Call it even with partial data.
- **Call `scheduleMeeting`** when the lead agrees to a meeting date/time.
- **ALWAYS call `endCall`** as the very last action of every call.

## Opening Line
"Hi, this is Elisa from Act Local. We help businesses get more qualified leads
through SEO, paid ads, and social media. Is now a bad time for a quick
2-minute chat?"
A few critical design decisions here:
- Tool usage is marked MANDATORY — without this, the LLM will sometimes “forget” to call the data capture functions, and you lose the lead data entirely
- Keep answers short — voice conversations need to be snappy. Long LLM responses feel unnatural when spoken aloud
- One question at a time — rapid-fire questions confuse people on the phone
- Edge cases are defined — voicemail, wrong number, not interested. The agent needs to know how to gracefully handle every scenario
The Agent Configuration
Create config/elisa-agent.json — this is your Vapi assistant config:
{
  "name": "Elisa - Act Local Sales Agent",
  "firstMessage": "Hi, this is Elisa from Act Local. Is now a bad time for a quick 2-minute chat about getting more qualified leads?",
  "model": {
    "provider": "anthropic",
    "model": "claude-3-5-sonnet",
    "temperature": 0.4,
    "maxTokens": 500
  },
  "voice": {
    "provider": "11labs",
    "voiceId": "sarah",
    "speed": 1,
    "stability": 0.5,
    "similarityBoost": 0.75
  },
  "transcriber": {
    "provider": "deepgram",
    "model": "nova-2",
    "language": "en-US"
  },
  "endCallPhrases": [
    "thanks for your time",
    "have a great day",
    "we will follow up by email",
    "goodbye"
  ],
  "maxDurationSeconds": 480,
  "silenceTimeoutSeconds": 20,
  "backgroundSound": "office"
}
Let’s break down the key choices:
- Claude 3.5 Sonnet via Anthropic — great at following complex instructions and function calling. Temperature 0.4 keeps it focused without being robotic
- ElevenLabs “sarah” voice — natural-sounding female voice. The stability/similarity settings control how expressive vs. consistent it sounds
- Deepgram Nova-2 for speech-to-text — fast and accurate, critical for real-time conversation
- maxDurationSeconds: 480 — 8-minute cap prevents runaway calls
- silenceTimeoutSeconds: 20 — hangs up after 20 seconds of silence
- backgroundSound: “office” — subtle ambient noise makes the call feel more natural
- endCallPhrases — Vapi watches for these phrases and auto-disconnects when Elisa says goodbye
Tool Definitions (Function Calling)
This is where the magic happens. Create config/tool-definitions.json with three tools that Elisa calls during the conversation:
{
  "tools": [
    {
      "type": "function",
      "function": {
        "name": "collectLeadInfo",
        "description": "Capture core lead details gathered during the call.",
        "parameters": {
          "type": "object",
          "properties": {
            "name": {
              "type": "string",
              "description": "Lead full name"
            },
            "email": {
              "type": "string",
              "description": "Lead email address"
            },
            "business": {
              "type": "string",
              "description": "Lead business name"
            },
            "serviceInterest": {
              "type": "string",
              "enum": ["SEO", "PPC", "Social Media",
                       "Digital Marketing", "Multiple", "Unknown"]
            },
            "qualificationStatus": {
              "type": "string",
              "enum": ["qualified", "not-qualified",
                       "follow-up-needed", "unknown"]
            },
            "businessType": {
              "type": "string",
              "description": "Type of business (e.g. Restaurant, Law Firm)"
            },
            "callOutcome": {
              "type": "string",
              "enum": ["meeting-scheduled", "not-interested",
                       "no-answer", "callback-requested",
                       "voicemail", "wrong-number", "not-qualified"]
            }
          },
          "required": ["name", "email", "business"]
        }
      }
    },
    {
      "type": "function",
      "function": {
        "name": "scheduleMeeting",
        "description": "Record agreed strategy meeting details.",
        "parameters": {
          "type": "object",
          "properties": {
            "date": {
              "type": "string",
              "description": "Meeting date in ISO format (YYYY-MM-DD)"
            },
            "time": {
              "type": "string",
              "description": "Meeting time with timezone, e.g. 14:30 UTC"
            },
            "notes": {
              "type": "string",
              "description": "Optional meeting context"
            }
          },
          "required": ["date", "time"]
        }
      }
    },
    {
      "type": "function",
      "function": {
        "name": "endCall",
        "description": "Finalize call outcome and reason for ending.",
        "parameters": {
          "type": "object",
          "properties": {
            "reason": {
              "type": "string",
              "enum": ["completed", "declined", "voicemail",
                       "wrong-number", "dnc", "technical-failure"]
            },
            "status": {
              "type": "string",
              "enum": ["qualified", "not-qualified",
                       "follow-up-needed", "unknown"]
            }
          },
          "required": ["reason", "status"]
        }
      }
    }
  ]
}
Here’s why we designed three separate tools instead of one big “save everything” function:
- collectLeadInfo captures contact details — called whenever Elisa talks to a real person, even with partial data
- scheduleMeeting is separate because not every lead books a meeting. Keeping it isolated means the LLM only calls it when relevant
- endCall records the final disposition. This fires as the very last action and gives you clean analytics on call outcomes
In Vapi, function calling works differently than in a chat API. The tool calls happen during the live voice conversation. Vapi intercepts them, executes them server-side (or sends them to your webhook), and feeds the results back to the LLM so it can continue the conversation naturally.
Step 3: Build the Vapi API Client
Create lib/vapi.ts — a clean TypeScript wrapper around the Vapi REST API:
const VAPI_BASE_URL = "https://api.vapi.ai";

export interface VapiCall {
  id: string;
  status: string;
  [key: string]: unknown;
}

export interface VapiCallListResponse {
  data: VapiCall[];
  [key: string]: unknown;
}

export class VapiClient {
  constructor(
    private readonly apiKey = process.env.VAPI_API_KEY,
    private readonly assistantId = process.env.VAPI_ASSISTANT_ID,
    private readonly baseUrl = VAPI_BASE_URL,
  ) {
    if (!this.apiKey) {
      throw new Error("Missing VAPI_API_KEY");
    }
  }

  async createCall(phoneNumber: string): Promise<VapiCall> {
    if (!this.assistantId) {
      throw new Error("Missing VAPI_ASSISTANT_ID");
    }

    return this.request<VapiCall>("/call", {
      method: "POST",
      body: JSON.stringify({
        assistantId: this.assistantId,
        phoneNumberId: process.env.VAPI_PHONE_NUMBER_ID,
        customer: { number: phoneNumber },
      }),
    });
  }

  async getCallDetails(callId: string): Promise<VapiCall> {
    return this.request<VapiCall>(`/call/${callId}`);
  }

  async listCalls(): Promise<VapiCallListResponse> {
    return this.request<VapiCallListResponse>("/call");
  }

  private async request<T>(
    path: string,
    init?: RequestInit
  ): Promise<T> {
    const response = await fetch(`${this.baseUrl}${path}`, {
      ...init,
      headers: {
        "Content-Type": "application/json",
        Authorization: `Bearer ${this.apiKey}`,
        ...(init?.headers ?? {}),
      },
    });

    if (!response.ok) {
      const body = await response.text();
      throw new Error(
        `Vapi request failed (${response.status}): ${body}`
      );
    }

    return (await response.json()) as T;
  }
}

export const getVapiClient = () => new VapiClient();
The client wraps three Vapi endpoints:
- createCall — triggers an outbound call to a phone number using your assistant
- getCallDetails — polls for call status (ringing, in-progress, ended)
- listCalls — lists all calls (useful for debugging)
Note the phoneNumberId in the create call payload — this is the Vapi phone number you purchased. Without it, Vapi doesn’t know which number to call from.
Step 4: Input Validation and Security
Before we build API routes, we need three utility modules. Never trust user input in a production calling system.
Phone Number Validation (lib/phone.ts)
const E164_REGEX = /^\+[1-9]\d{7,14}$/;

export function isValidE164(phoneNumber: string): boolean {
  return E164_REGEX.test(phoneNumber.trim());
}

export function normalizePhoneNumber(
  countryCode: string,
  localNumber: string
): string {
  const cleanedLocal = localNumber.replace(/[^\d]/g, "");
  const cleanedCountry = countryCode.startsWith("+")
    ? countryCode
    : `+${countryCode}`;

  if (!cleanedLocal) return cleanedCountry;
  return `${cleanedCountry}${cleanedLocal.replace(/^0+/, "")}`;
}
E.164 is the international phone number format that Vapi requires (e.g., +14155550123). The normalizePhoneNumber function combines a country code dropdown with a local number input, stripping formatting characters and leading zeros.
Input Sanitization (lib/sanitize.ts)
export function sanitizeText(
  value: unknown,
  maxLength = 300
): string {
  if (typeof value !== "string") return "";
  return value
    .replace(/[<>]/g, "")
    .replace(/[\u0000-\u001F\u007F]/g, "")
    .trim()
    .slice(0, maxLength);
}

export function sanitizePhone(value: unknown): string {
  const normalized = sanitizeText(value, 30);
  return normalized.replace(/[^\d+]/g, "");
}

export function sanitizeEmail(value: unknown): string {
  return sanitizeText(value, 120).toLowerCase();
}
Rate Limiting (lib/rate-limit.ts)
type RateLimitOptions = {
  maxRequests: number;
  windowMs: number;
};

type RateLimitResult = {
  allowed: boolean;
  retryAfterSeconds: number;
  remaining: number;
};

type Entry = { count: number; resetAt: number };

const memoryStore = new Map<string, Entry>();

export function checkRateLimit(
  key: string,
  { maxRequests, windowMs }: RateLimitOptions,
  now = Date.now(),
): RateLimitResult {
  const entry = memoryStore.get(key);

  if (!entry || now >= entry.resetAt) {
    memoryStore.set(key, { count: 1, resetAt: now + windowMs });
    return { allowed: true, retryAfterSeconds: 0,
             remaining: Math.max(0, maxRequests - 1) };
  }

  if (entry.count >= maxRequests) {
    return {
      allowed: false,
      retryAfterSeconds: Math.max(
        1, Math.ceil((entry.resetAt - now) / 1000)
      ),
      remaining: 0,
    };
  }

  entry.count += 1;
  memoryStore.set(key, entry);
  return { allowed: true, retryAfterSeconds: 0,
           remaining: Math.max(0, maxRequests - entry.count) };
}
This is an in-memory rate limiter — one call per minute per IP. For a demo app this is fine. In production, you’d swap this for Redis-backed rate limiting. The key insight: you’re paying per call. Without rate limiting, someone could drain your Vapi credits with a script.
Step 5: Build the API Routes
Now the backend. We need four API routes that connect the landing page to Vapi and handle the data pipeline.
POST /api/call — Trigger an Outbound Call
Create app/api/call/route.ts:
import { NextRequest, NextResponse } from "next/server";
import { isValidE164 } from "@/lib/phone";
import { checkRateLimit } from "@/lib/rate-limit";
import { sanitizePhone } from "@/lib/sanitize";
import { getVapiClient } from "@/lib/vapi";

export async function POST(request: NextRequest) {
  // Rate limit: 1 call per minute per IP
  const ip = request.headers
    .get("x-forwarded-for")?.split(",")[0]?.trim() || "unknown";
  const rateLimit = checkRateLimit(
    `call:${ip}`, { maxRequests: 1, windowMs: 60_000 }
  );

  if (!rateLimit.allowed) {
    return NextResponse.json(
      { error: "Rate limit exceeded. Please wait." },
      { status: 429,
        headers: { "Retry-After":
                     String(rateLimit.retryAfterSeconds) } },
    );
  }

  try {
    const body = (await request.json()) as
      { phoneNumber?: string };
    const phoneNumber = sanitizePhone(body.phoneNumber);

    if (!isValidE164(phoneNumber)) {
      return NextResponse.json(
        { error: "Invalid phone number. Use E.164 format." },
        { status: 400 },
      );
    }

    const vapi = getVapiClient();
    const call = await vapi.createCall(phoneNumber);

    return NextResponse.json({
      callId: call.id,
      status: call.status,
    });
  } catch (error) {
    return NextResponse.json(
      { error: error instanceof Error
          ? error.message
          : "Unable to start outbound call." },
      { status: 500 },
    );
  }
}
The flow: sanitize the phone number → validate E.164 format → check rate limit → call Vapi API → return the call ID so the frontend can poll for status.
GET /api/call/[callId] — Poll Call Status
Create app/api/call/[callId]/route.ts:
import { NextRequest, NextResponse } from "next/server";
import { sanitizeText } from "@/lib/sanitize";
import { getVapiClient } from "@/lib/vapi";

const TERMINAL_STATUSES = new Set([
  "ended", "completed", "failed", "no-answer", "busy"
]);

export async function GET(
  _request: NextRequest,
  context: { params: Promise<{ callId: string }> }
) {
  try {
    const { callId: rawCallId } = await context.params;
    const callId = sanitizeText(rawCallId, 120);

    if (!callId) {
      return NextResponse.json(
        { error: "Missing call id." }, { status: 400 }
      );
    }

    const call = await getVapiClient().getCallDetails(callId);
    const status = String(call.status ?? "unknown").toLowerCase();

    return NextResponse.json({
      callId,
      status: TERMINAL_STATUSES.has(status)
        ? "completed" : status,
      durationSeconds: typeof call.duration === "number"
        ? call.duration : undefined,
      outcome: typeof call.endedReason === "string"
        ? call.endedReason : undefined,
    });
  } catch (error) {
    return NextResponse.json(
      { error: error instanceof Error
          ? error.message
          : "Unable to fetch call status." },
      { status: 500 },
    );
  }
}
The frontend polls this endpoint after triggering a call. It returns a simplified status — either the call is still in progress, or it’s completed (with duration and outcome).
POST /api/webhook — Receive Vapi End-of-Call Data
This is the most important route. When a call ends, Vapi sends an end-of-call-report webhook with the full transcript, tool calls, and analysis. Create app/api/webhook/route.ts:
import { NextRequest, NextResponse } from "next/server";
import { extractLeadFromVapiPayload } from "@/lib/webhook";

export async function POST(request: NextRequest) {
  try {
    const payload = (await request.json()) as
      Record<string, unknown>;
    const messageType = (
      payload.message as Record<string, unknown>
    )?.type as string | undefined;

    console.log(
      `[webhook] Received event: ${messageType ?? "unknown"}`
    );

    // Vapi sends many event types — we only process
    // end-of-call-report
    if (messageType !== "end-of-call-report") {
      return NextResponse.json(
        { ok: true, skipped: true, messageType }
      );
    }

    const lead = extractLeadFromVapiPayload(payload.message);
    console.log(
      `[webhook] Processing lead: ${lead.name} / ${lead.business}`
    );

    // Forward to n8n for automation
    const n8nWebhookUrl = process.env.N8N_WEBHOOK_URL;
    let n8nForwarded = false;

    if (n8nWebhookUrl) {
      try {
        const n8nResponse = await fetch(n8nWebhookUrl, {
          method: "POST",
          headers: { "Content-Type": "application/json" },
          body: JSON.stringify({
            source: "vapi",
            lead,
            raw: payload.message,
          }),
        });
        n8nForwarded = n8nResponse.ok;
      } catch (err) {
        console.error("[webhook] n8n forward failed:", err);
      }
    }

    return NextResponse.json({
      ok: true,
      n8nForwarded,
      lead: { name: lead.name, business: lead.business },
    });
  } catch (error) {
    console.error("[webhook] Error:", error);
    return NextResponse.json(
      { ok: false, error: error instanceof Error
          ? error.message
          : "Webhook processing failed." },
      { status: 500 },
    );
  }
}
Critical detail: Vapi sends many event types during a call (speech-update, transcript, function-call, etc.). We respond 200 OK to all of them (so Vapi doesn’t retry), but only process end-of-call-report. This is where the complete tool call data lives.
The Webhook Data Extraction (lib/webhook.ts)
The extractLeadFromVapiPayload function deserves its own section because the Vapi payload structure is… interesting:
import { sanitizeEmail, sanitizePhone, sanitizeText }
  from "./sanitize";
import type { LeadRecord } from "./sheets";

type ToolCall = {
  function?: {
    name?: string;
    arguments?: string | Record<string, unknown>;
  };
};

function safeParseArguments(
  value: string | Record<string, unknown> | undefined
): Record<string, unknown> {
  if (!value) return {};
  if (typeof value === "object") return value;
  try {
    return JSON.parse(value) as Record<string, unknown>;
  } catch {
    return {};
  }
}

export function extractLeadFromVapiPayload(
  payload: unknown
): LeadRecord {
  const data = (payload ?? {}) as {
    call?: {
      id?: string;
      customer?: { number?: string };
      startedAt?: string;
    };
    transcript?: string;
    analysis?: { summary?: string };
    toolCalls?: ToolCall[];
    artifact?: {
      messages?: Array<{
        role?: string;
        toolCalls?: ToolCall[];
        tool_calls?: ToolCall[];
      }>;
    };
  };

  // Vapi puts tool calls in artifact.messages
  // (role: "tool_calls"), not top-level
  const topLevelToolCalls = data.toolCalls ?? [];
  const artifactToolCalls = (data.artifact?.messages ?? [])
    .filter((msg) => msg.role === "tool_calls")
    .flatMap((msg) => msg.toolCalls ?? msg.tool_calls ?? []);

  const toolCalls = topLevelToolCalls.length > 0
    ? topLevelToolCalls
    : artifactToolCalls;

  // Extract data from each tool call type
  const leadArgs = toolCalls
    .filter((c) => c.function?.name === "collectLeadInfo")
    .map((c) => safeParseArguments(c.function?.arguments))[0]
    ?? {};

  const scheduleArgs = toolCalls
    .filter((c) => c.function?.name === "scheduleMeeting")
    .map((c) => safeParseArguments(c.function?.arguments))[0]
    ?? {};

  const endCallArgs = toolCalls
    .filter((c) => c.function?.name === "endCall")
    .map((c) => safeParseArguments(c.function?.arguments))[0]
    ?? {};

  const summary = sanitizeText(
    data.analysis?.summary ?? "", 500
  );

  return {
    id: sanitizeText(
      data.call?.id ?? `call-${Date.now()}`, 80
    ),
    name: sanitizeText(leadArgs.name, 80) || "Unknown",
    email: sanitizeEmail(leadArgs.email),
    business: sanitizeText(leadArgs.business, 120)
      || "Unknown",
    businessType: sanitizeText(leadArgs.businessType, 120)
      || "Unknown",
    serviceInterest: sanitizeText(
      leadArgs.serviceInterest, 120
    ) || "General Digital Marketing",
    callOutcome: sanitizeText(leadArgs.callOutcome, 80)
      || sanitizeText(endCallArgs.reason, 80)
      || "unknown",
    meetingStatus: scheduleArgs.date && scheduleArgs.time
      ? `${sanitizeText(scheduleArgs.date)} ${sanitizeText(scheduleArgs.time)}`
      : "Not scheduled",
    phoneNumber: sanitizePhone(
      data.call?.customer?.number ?? ""
    ),
    notes: summary
      || sanitizeText(data.transcript, 400),
    createdAt: sanitizeText(data.call?.startedAt, 60)
      || new Date().toISOString(),
  };
}
The tricky part: Vapi’s payload structure has evolved across versions. Tool calls can appear in payload.toolCalls (top-level) OR nested inside payload.artifact.messages where role === "tool_calls". And the arguments can be either a JSON string or a pre-parsed object. This function handles all those cases.
GET /api/leads — Fetch Leads for the Dashboard
Create app/api/leads/route.ts:
import { NextResponse } from "next/server";
import { fetchLeadRowsFromGoogleSheets } from "@/lib/sheets";
import { SAMPLE_LEADS } from "@/lib/sample-data";

export async function GET() {
  try {
    const leads = await fetchLeadRowsFromGoogleSheets();

    // Fall back to sample data if sheet is empty
    if (leads.length === 0) {
      return NextResponse.json({ leads: SAMPLE_LEADS });
    }

    return NextResponse.json({ leads });
  } catch {
    // If Sheets API fails, still show sample data
    return NextResponse.json(
      { leads: SAMPLE_LEADS, fallback: true }
    );
  }
}
This gracefully falls back to sample data if Google Sheets isn’t configured yet — important for demos and local development.
Step 6: Google Sheets Integration
We use Google Sheets as a “visible database” — perfect for demos because clients can watch leads appear in real time. Create lib/sheets.ts:
import { sanitizeEmail, sanitizePhone, sanitizeText }
  from "./sanitize";

export type LeadRecord = {
  id: string;
  name: string;
  email: string;
  business: string;
  businessType: string;
  serviceInterest: string;
  callOutcome: string;
  meetingStatus: string;
  phoneNumber: string;
  notes: string;
  createdAt: string;
};

const SHEET_NAME = process.env.GOOGLE_SHEET_NAME ?? "Leads";

function parseGvizJson(body: string): unknown[][] {
  const match = body.match(
    /google\.visualization\.Query\.setResponse\(([\s\S]*)\);?$/
  );
  if (!match) return [];

  const payload = JSON.parse(match[1]) as {
    table?: {
      rows?: Array<{ c?: Array<{ v?: unknown }> }>
    };
  };

  const rows = payload.table?.rows ?? [];
  return rows.map((row) =>
    (row.c ?? []).map((cell) => cell?.v ?? "")
  );
}

export async function fetchLeadRowsFromGoogleSheets():
  Promise<LeadRecord[]> {
  const sheetId = process.env.GOOGLE_SHEETS_ID;
  if (!sheetId) return [];

  // Use Google's public visualization API — no auth needed
  // for sheets shared as "anyone with the link"
  const gvizUrl =
    `https://docs.google.com/spreadsheets/d/${sheetId}` +
    `/gviz/tq?tqx=out:json` +
    `&sheet=${encodeURIComponent(SHEET_NAME)}`;

  const response = await fetch(gvizUrl, { cache: "no-store" });
  if (!response.ok) {
    throw new Error(
      `Google Sheets request failed (${response.status})`
    );
  }

  const raw = await response.text();
  const rows = parseGvizJson(raw);

  return rows
    .map((row, index) => ({
      id: sanitizeText(row[0], 80)
        || `sheet-${index + 1}`,
      name: sanitizeText(row[1], 80),
      email: sanitizeEmail(row[2]),
      business: sanitizeText(row[3], 120),
      businessType: sanitizeText(row[4], 120)
        || "Unknown",
      serviceInterest: sanitizeText(row[5], 120),
      callOutcome: sanitizeText(row[6], 80)
        || "unknown",
      meetingStatus: sanitizeText(row[7], 120),
      phoneNumber: sanitizePhone(row[8]),
      notes: sanitizeText(row[9], 400),
      createdAt: sanitizeText(row[10], 80)
        || new Date().toISOString(),
    }))
    .filter((lead) =>
      lead.name || lead.business || lead.email
    )
    .sort((a, b) =>
      new Date(b.createdAt).getTime()
      - new Date(a.createdAt).getTime()
    );
}
A clever trick here: we use Google’s Visualization API (/gviz/tq) instead of the full Sheets API. This lets us read data from any sheet shared as “anyone with the link” — no OAuth, no service account, no auth at all. Perfect for a demo dashboard. The response is a JSONP-style wrapper that we parse out.
Step 7: Build the Landing Page
The landing page has four sections: hero with web call button, live lead dashboard, integration showcase, and footer.
Web Call Button Component
This is the star of the UI — a button that lets visitors talk to Elisa directly in their browser using the Vapi Web SDK:
"use client";

import { useCallback, useEffect, useRef, useState } from "react";

type CallState = "idle" | "connecting" | "active" | "ended";

export function WebCallButton() {
  const [callState, setCallState] = useState<CallState>("idle");
  const [duration, setDuration] = useState(0);
  const [error, setError] = useState<string | null>(null);
  const vapiRef = useRef<any>(null);
  const timerRef = useRef<ReturnType<typeof setInterval> | null>(null);
  const callEndedRef = useRef(false);

  useEffect(() => {
    return () => {
      if (timerRef.current) clearInterval(timerRef.current);
      if (vapiRef.current) {
        try { vapiRef.current.stop(); } catch {}
      }
    };
  }, []);

  const startCall = useCallback(async () => {
    setError(null);
    setCallState("connecting");
    setDuration(0);
    callEndedRef.current = false;

    try {
      const { default: Vapi } = await import("@vapi-ai/web");
      const publicKey =
        process.env.NEXT_PUBLIC_VAPI_PUBLIC_KEY;

      if (!publicKey) {
        throw new Error("Missing VAPI public key.");
      }

      const vapi = new Vapi(publicKey);
      vapiRef.current = vapi;

      vapi.on("call-start", () => {
        setCallState("active");
        timerRef.current = setInterval(() => {
          setDuration((d) => d + 1);
        }, 1000);
      });

      vapi.on("call-end", () => {
        callEndedRef.current = true;
        setCallState("ended");
        if (timerRef.current) {
          clearInterval(timerRef.current);
          timerRef.current = null;
        }
      });

      vapi.on("error", (e: any) => {
        // Ignore errors that fire after call end
        if (callEndedRef.current) return;
        if (timerRef.current) {
          // Had an active call — treat as normal end
          callEndedRef.current = true;
          clearInterval(timerRef.current);
          timerRef.current = null;
          setCallState("ended");
          return;
        }
        setError("Could not connect. Please try again.");
        setCallState("idle");
      });

      const assistantId =
        process.env.NEXT_PUBLIC_VAPI_ASSISTANT_ID;
      if (!assistantId) {
        throw new Error("Missing assistant configuration.");
      }

      await vapi.start(assistantId);
    } catch (err) {
      setError(
        err instanceof Error
          ? err.message : "Failed to start call."
      );
      setCallState("idle");
    }
  }, []);

  const endCall = useCallback(() => {
    if (vapiRef.current) {
      try { vapiRef.current.stop(); } catch {}
    }
    setCallState("ended");
    if (timerRef.current) {
      clearInterval(timerRef.current);
      timerRef.current = null;
    }
  }, []);

  const formatTime = (s: number) => {
    const m = Math.floor(s / 60);
    const sec = s % 60;
    return `${m}:${sec.toString().padStart(2, "0")}`;
  };

  // Render different UI for each state:
  // idle → "Talk to Elisa Now" button
  // connecting → pulsing "Connecting..." indicator
  // active → green status bar + duration + "End Call"
  // ended → summary + "Try Again" button
  return (
    <div className="space-y-4 rounded-2xl border
      border-white/15 bg-black/30 p-5 shadow-2xl
      backdrop-blur">
      {/* ... state-specific UI rendering ... */}
    </div>
  );
}
Key implementation details:
- Dynamic import of
@vapi-ai/web— the SDK is loaded only when the user clicks “Talk to Elisa Now”, keeping the initial page load fast - callEndedRef — the Vapi SDK sometimes fires error events after a call ends normally. This ref prevents those phantom errors from showing to the user
- Four states (idle → connecting → active → ended) — each renders completely different UI, giving the user clear feedback throughout
- Browser microphone — no phone number needed. This is the key demo feature: visitors can talk to your AI agent instantly
Phone Call Form (Alternative Input)
We also built a traditional phone number input form as a PhoneCallForm component. It collects a country code + local number, validates E.164 format, calls /api/call, and shows a pulsing “Elisa is calling you…” animation on success. The web call button is the default because it has zero friction, but the phone form is available for users who prefer an actual phone call.
Main Page Layout
The page composition is clean — four sections stacked vertically:
"use client";

import { IntegrationShowcase } from "@/components/IntegrationShowcase";
import { Footer } from "@/components/Footer";
import { LiveDashboard } from "@/components/LiveDashboard";
import { WebCallButton } from "@/components/WebCallButton";

export default function Home() {
  return (
    <main className="min-h-screen bg-[radial-gradient(
      circle_at_top,_#1B3A6B_0%,_#05070b_45%)]
      px-4 py-10 text-slate-100">
      <div className="mx-auto max-w-6xl">
        {/* Hero: branding + web call button */}
        <section className="grid lg:grid-cols-[1.4fr_1fr]">
          <div>
            <h1>Experience AI Sales in Action</h1>
            <p>Meet Elisa: the outbound AI sales rep...</p>
          </div>
          <WebCallButton />
        </section>

        <LiveDashboard />
        <IntegrationShowcase />
        <Footer />
      </div>
    </main>
  );
}
Step 8: The n8n Automation Workflow
The n8n workflow is the automation backbone. When a call ends, data flows: Vapi → your webhook → n8n → Google Sheets + email + sales alert. Here’s how to set it up:
Workflow Structure
- Webhook Trigger — receives POST from your Next.js
/api/webhookroute - JSON Parse — extracts the lead data from the payload
- Conditional Branch — checks
lead.qualified === true - Qualified path: Append to Google Sheets → Send confirmation email to lead → Alert sales team via Slack/webhook
- Declined path: Append to separate “Declined” section → Skip notifications
Setting Up the Webhook
In n8n, create a new workflow and add a Webhook node. Set the path to /act-local-callbot. Copy the production URL — it’ll look like:
https://your-n8n-domain.com/webhook/act-local-callbotSet this as your N8N_WEBHOOK_URL environment variable in the Next.js app.
Expected Payload
Your webhook sends this shape to n8n:
{
  "source": "vapi",
  "lead": {
    "id": "call_abc123",
    "name": "Sara Ali",
    "email": "sara@acme.com",
    "business": "Acme Dental",
    "businessType": "Dental Practice",
    "serviceInterest": "SEO",
    "callOutcome": "meeting-scheduled",
    "meetingStatus": "2026-03-20 14:00",
    "phoneNumber": "+971500000000",
    "notes": "Wants local SEO package",
    "createdAt": "2026-03-16T10:30:00Z"
  },
  "raw": { ... }
}
Google Sheets Setup
Create a Google Sheet with a Leads tab and these column headers in row 1:
Timestamp | Call ID | Call Status | Name | Email | Business | Phone | Service Interest | Meeting Date | Meeting Time | Meeting Status | Outcome | Notes
Share the sheet as “Anyone with the link can view” so the dashboard can read it without authentication.
Testing the Workflow
You can test the full pipeline with a curl command:
$ curl -X POST "https://your-n8n-domain/webhook/act-local-callbot" \
  -H "content-type: application/json" \
  -d '{
    "source": "vapi",
    "lead": {
      "qualified": true,
      "name": "Demo Lead",
      "email": "demo@example.com",
      "business": "Demo Cafe",
      "phone": "+971500000001",
      "serviceInterest": "PPC",
      "meetingDate": "2026-03-22",
      "meetingTime": "11:30",
      "meetingStatus": "Requested",
      "notes": "Budget approved"
    }
  }'
If everything is wired correctly, you should see a new row in Google Sheets within seconds.
Step 9: Creating the Vapi Assistant
Now let’s wire it all together in the Vapi dashboard:
- Log into dashboard.vapi.ai
- Go to Assistants → Create Assistant
- Paste your system prompt from
config/system-prompt.md - Set the model to Claude 3.5 Sonnet (Anthropic provider)
- Set the voice to ElevenLabs → sarah
- Set the transcriber to Deepgram → nova-2
- Under Tools, add the three functions from
config/tool-definitions.json - Under Advanced, set:
- Max duration: 480 seconds
- Silence timeout: 20 seconds
- Background sound: office
- End call phrases: “thanks for your time”, “have a great day”, “goodbye”
- Under Server URL, set your webhook endpoint:
https://your-app.vercel.app/api/webhook - Copy the Assistant ID and add it to your
.env.local
Getting a Phone Number
In the Vapi dashboard, go to Phone Numbers → Buy Number. Select a US number (or wherever your leads are). Copy the Phone Number ID and add it to your env as VAPI_PHONE_NUMBER_ID.
Note: web calls (browser-to-AI) don’t require a phone number — they use WebRTC directly. Phone numbers are only needed for outbound calling to real phone numbers.
Step 10: Deploy to Vercel
The project is configured for one-click Vercel deployment:
$ git init
$ git add .
$ git commit -m "Initial commit: Act Local AI Callbot"
$ npx vercel --prod
In the Vercel dashboard, add all your environment variables from .env.local. After deployment, update the Vapi webhook URL to point to your production domain:
https://your-app.vercel.app/api/webhookHow the Full Flow Works (End to End)
Let’s trace through a complete call:
- Visitor clicks “Talk to Elisa Now” on the landing page
- The Vapi Web SDK initializes in their browser, requests microphone access
- WebRTC connection established — visitor hears Elisa say: “Hi, this is Elisa from Act Local. Is now a bad time for a quick 2-minute chat about getting more qualified leads?”
- The visitor responds naturally. Deepgram Nova-2 transcribes their speech in real time
- Claude 3.5 Sonnet processes the transcript and generates responses following the system prompt
- ElevenLabs converts Claude’s text responses into natural speech
- During the conversation, Claude calls
collectLeadInfowith the data it’s gathered — Vapi intercepts this function call - If the lead books a meeting, Claude calls
scheduleMeeting - When the conversation ends, Claude calls
endCallwith the final status - Vapi fires an
end-of-call-reportwebhook to your/api/webhookendpoint - Your webhook extracts lead data from the tool calls and forwards to n8n
- n8n receives the data, checks qualification status, appends to Google Sheets, sends confirmation email, alerts sales team
- The landing page dashboard refreshes and shows the new lead
The whole flow — from click to lead in CRM — takes about 2-5 minutes, entirely automated.
Costs and Pricing Considerations
Here’s what each call costs (approximately):
- Vapi platform: ~$0.05/minute (includes orchestration)
- Claude 3.5 Sonnet: ~$0.01-0.03 per call (depends on conversation length)
- ElevenLabs: included in Vapi’s per-minute pricing
- Deepgram: included in Vapi’s per-minute pricing
- Phone number: ~$1-2/month
- Telephony (outbound): ~$0.01-0.05/minute (varies by country)
A typical 3-minute sales call costs roughly $0.15-0.25 total. Compare that to an SDR’s hourly rate and you start to see why this technology is compelling. Web calls (browser) are significantly cheaper since there’s no telephony cost.
Lessons Learned Building This
A few things we discovered that aren’t in the docs:
- Vapi sends MANY webhook events per call — not just end-of-call. You’ll get speech-update, transcript, function-call-result, etc. Always return 200 OK to all of them to prevent retries, but only process
end-of-call-report - Tool call data location changes — it can be in
payload.toolCallsorpayload.artifact.messages. Check both - The Vapi Web SDK fires error events after normal call endings — use a ref to track whether the call has ended, and ignore post-end errors
- Low temperature (0.4) is critical for voice — higher temperatures produce creative but rambling responses that sound terrible when spoken
- Short maxTokens (500) keeps responses snappy — voice conversations need short, punchy replies. A 2-paragraph LLM response is painful to listen to
- The “MANDATORY” tool usage instruction matters — without it, Claude sometimes “forgets” to call collectLeadInfo, and you lose the data
What You Could Build Next
This project is a foundation. Here’s where you could take it:
- CRM integration — swap Google Sheets for HubSpot, Salesforce, or Pipedrive via n8n
- Calendar booking — connect Calendly or Cal.com so Elisa books directly into your calendar
- Multi-agent system — different agents for different services (SEO specialist, PPC specialist)
- Inbound call handling — configure a Vapi phone number to receive calls and route them to your agent
- Call recording and analytics — Vapi stores recordings. Build a dashboard to review call quality
- Follow-up sequences — use n8n to trigger email sequences for leads who requested callbacks
- A/B test system prompts — create multiple assistant configs and randomly assign callers to test conversion rates
Wrapping Up
We built a complete AI-powered outbound sales system that can make real phone calls, hold natural conversations, qualify leads, book meetings, and pipe everything into a CRM — with zero human intervention. The tech stack (Vapi + Claude + n8n + Next.js) handles the heavy lifting: telephony, speech processing, conversation intelligence, automation, and UI.
The entire project is open source and deployable in under an hour. The hardest part isn’t the code — it’s writing a system prompt that makes your AI agent sound natural, handle edge cases gracefully, and reliably capture data through function calling.
Voice AI is moving fast. A year ago, building something like this would have required Twilio, a custom STT pipeline, a custom TTS pipeline, and weeks of integration work. Today it’s an afternoon project with the right tools.
If you build something with this, we’d love to hear about it. Drop us a line or share it on X.